How to Bridge ETH to Zero: A Step-by-Step Guide

Zero is an emerging Layer 2 network offering fast, low-cost, and secure transactions while leveraging Ethereum’s security through zero-knowledge (ZK) technology. If you're looking to expand your on-chain experience and explore new DeFi opportunities, bridging ETH to Zero is a great first step. In this guide, we’ll show you how to bridge ETH to Zero using the fast, secure, and user-friendly Relay platform.
Why Bridge ETH to Zero?
Zero is built on the foundation of ZK rollups, giving users:
- ✅ Lightning-fast transaction speeds
- ✅ Significantly reduced gas fees
- ✅ Ethereum-grade decentralization and security
- ✅ A growing ecosystem of dApps and DeFi platforms
Bridging your ETH to Zero unlocks access to an efficient and scalable Layer 2 network that’s tailor-made for traders, builders, and everyday users looking to escape Ethereum’s high fees.
What You’ll Need
To bridge your ETH to Zero, you’ll need:
- ✅ ETH in an EVM-compatible wallet (e.g., MetaMask)
- ✅ A small amount of ETH on Ethereum to cover gas fees
- ✅ Access to Relay, a secure and intuitive cross-chain bridge
🔐 Security Tip: Always verify that you’re on the official Relay.link platform and confirm wallet addresses before initiating any transactions.
Step-by-Step: How to Bridge ETH to Zero Using Relay
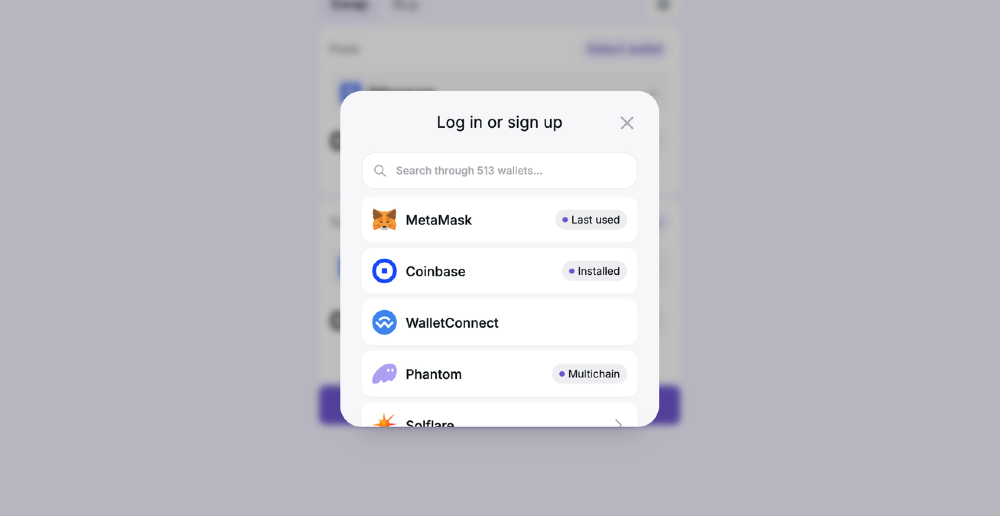
🔹 Step 1: Connect Your Wallet on Relay
- Visit Relay.link
- Click Connect Wallet
- Choose MetaMask or another EVM wallet
- Ensure you're connected to the Ethereum Mainnet
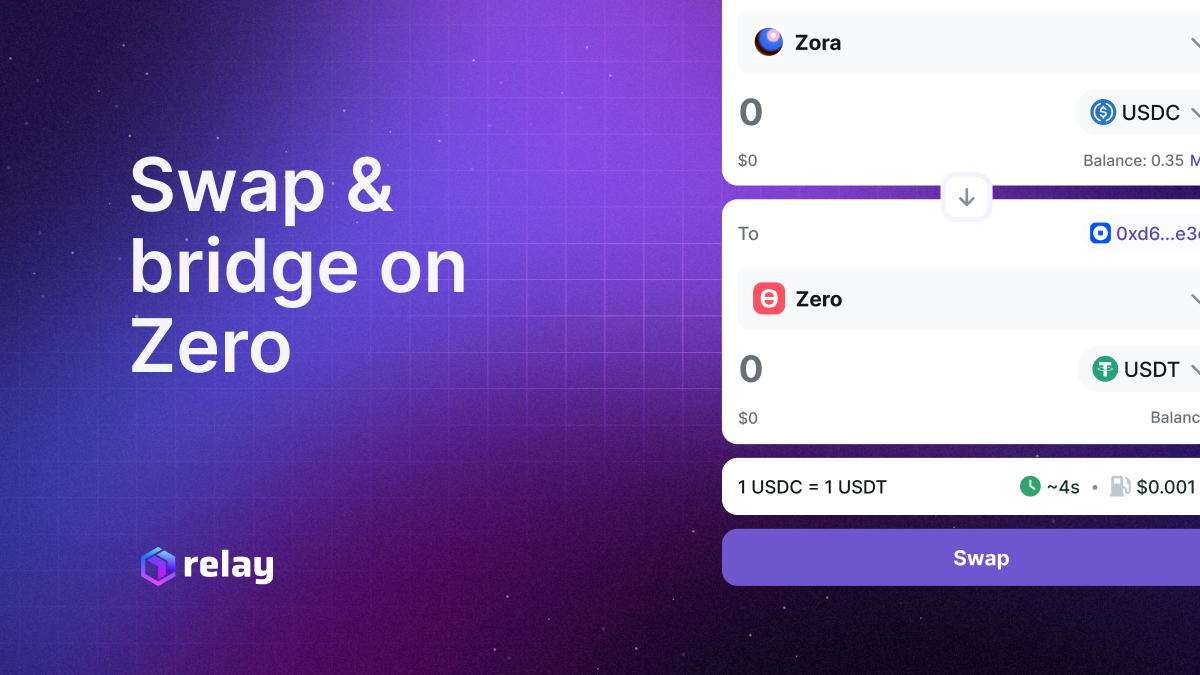
🔹 Step 2: Configure the Bridge
- Navigate to the Bridge tab
- Set:
- From: Ethereum
- To: Zero
- Asset: ETH
- Enter the amount of ETH you’d like to bridge
- Confirm your connected wallet is the one that should receive the bridged ETH on Zero
🔹 Step 3: Approve and Bridge
- If this is your first time bridging ETH, you’ll be prompted to approve the token for bridging—approve it in your wallet
- Click Bridge Now
- Confirm the transaction in MetaMask, including the gas fee on Ethereum
🔹 Step 4: Monitor the Bridging Process
- Relay will process your transaction and begin the bridging
- Bridging times typically take a few minutes depending on Ethereum and Zero network conditions
- You can track progress directly on the Relay dashboard
Once complete, your ETH will arrive in your wallet on the Zero network.
What to Do With ETH on Zero?
Once your ETH has arrived on Zero, you can:
- ✅ Interact with DeFi platforms launching on Zero
- ✅ Trade tokens with lower fees and faster finality
- ✅ Use your ETH in new dApps and NFT marketplaces
- ✅ Easily bridge back to Ethereum when needed via Relay
🔧 You may need to manually add Zero to your wallet. Check Zero’s docs for RPC details and instructions.
Tips for a Smooth Bridging Experience
- 💼 Double-check wallet networks: Start on Ethereum, then switch to Zero to see your bridged ETH
- 💸 Keep ETH for gas: Ethereum-side bridging will still require gas, so ensure your wallet has enough ETH
- 🧭 Use official tools: Always use Relay.link for trusted bridging, and avoid sketchy interfaces
- 📖 Need Help? Check the Relay Docs or Zero’s documentation
Bridging ETH to Zero is a seamless way to access the next generation of scalable, secure blockchain infrastructure. With Relay, the process is intuitive and fast—no complex steps, no guesswork, just smooth cross-chain action.